# Ticketing - Helpdesk Customer User Guide
# How to: access Helpdesk Platform
To access the customer support and ticketing platform within the DOME project, simply open a web browser and navigate to the following address: [https://ticketing.dome-marketplace-dev.org/](https://ticketing.dome-marketplace-dev.org/)
# How to: create new account
To create a new user account, the customer should follow these steps:
- Open a web browser and navigate to the URL: [https://ticketing.dome-marketplace-dev.org/](https://ticketing.dome-marketplace-dev.org/)
- Look for "**Register as a new user"** option at the bottom of the login page, as you can see from the screenshot below.
[](https://knowledgebase.dome-marketplace-dev.org/uploads/images/gallery/2024-05/nqLimage.png)
- Fill in the necessary information for creating your account. This tipically includes your email address, username, and password. Then, click on "Create my account" button.
[](https://knowledgebase.dome-marketplace-dev.org/uploads/images/gallery/2024-05/1NDimage.png)
- After entering the required information, the system requires email verification. Check your email for a confirmation link and follow the instructions.
- Once your account is created and verified, return to the login page and log in using your newly created credentials.
# Breakdown of key features on Helpdesk main page
Here's a breakdown of the key features within the DOME Hepldesk landing page:
- **My Tickets**: View a list of all your submitted tickets, with their status, priority, and last update.
- **My Organization Tickets**: View a list of all tickets by users belonging to same Organization, with related info.
- **Filter and Search**: Easily find specific tickets by using filters based on various parameters such as ticket ID, subject, status, etc.
- **Knowledge Base**: Users can find self-help articles directly accessing documentation repository (i.e., Bookstack).
- **Ticket Submission**: Submit new tickets with clear fields for describing your issue, selecting categories, and attaching relevant files.
- **Profile Settings**: Users can usually manage their account settings, update contact information, and change preferences.
# How to: open a new request
Creating a new ticket within the DOME project's customer support and ticketing platform is a straightforward process that allows customers to swiftly communicate their inquiries or report issues. Customers should follow these steps to initiate a new ticket:
- **Login**: ensure you are logged into the platform using your credentials. If you're a new user, refer to the "Access and Navigation" section for guidance on account creation.
- **Navigate to Ticket Creation**: locate and select the "Create New Ticket" option represented by "+" button, accessible from the main navigation menu.
[](https://knowledgebase.dome-marketplace-dev.org/uploads/images/gallery/2024-05/oJtimage.png)
- **Fill in Ticket Details:** complete the required fields, providing detailed information about your request. The process of opening a new ticket involves the customer filling out the following form, indicating in this order:i. Group membership,
ii. Problem (subgroup that best categorizes their request),
iii. Title,
iv. Text (description of the issue),
v. Any attached files or documents,
vi. Click on "Create" button.
[](https://knowledgebase.dome-marketplace-dev.org/uploads/images/gallery/2024-05/9ZHimage.png)
- Upon successful submission, the Customerr will receive a confirmation message (via email) and his newly created ticket will be visible within the "My Tickets" section in the "Overviews" Dashboard reachable from main page.
By following these steps, the process ensure that any concern is promptly addressed by specific Group of the support team. For this reason, it is important that the customer, during the ticket creation phase, fills out the fields correctly.
# How to: see ticket details and receive an update on request status
Once a ticket is submitted, customers can track its status, keeping them informed about the progress of their request. By clicking on a ticket from the list in the "Overviews" section, the user access to the specific details page. To view the details of a specific ticket, click on the "My Tickets" button in the main menu . The list will display all customer's tickets with essential details such as the ticket ID, subject, status and creation date. Click on the ticket title or ID to access the full details of a ticket.
Through the ticket details page the Customer can add question on open tickets by clicking on the text message box and typing the question.

# How to: respond to a Ticket
Upon reaching the complete details page within the "My Tickets" section, customers will discover the "Add Comment" text-box located at the bottom.
By clicking on it, the customer is allowed to either attach comments (i) or files (ii). In the "Activity" section you can keep track of the ticket's history and review the chronological log of actions, comments, and status changes (see blue box in the below screenshot).
All changes made on the detail page must be confirmed by clicking the "Update" button located at the bottom right of the Ticket details page.
[](https://knowledgebase.dome-marketplace-dev.org/uploads/images/gallery/2024-05/ssHimage.png)
# How to: use attributes for advanced search
To search for specific items in the Customer Care platform fill the search bar on the top of the left-sided panel in the main page.
You can use attributes as follow:
- Number: Search for a Ticketnumber (Example: number:1118566, number:11185\*).
- Title: If you need to use spacings in the search phrase, use quotes. Search engine will do a AND-Search over the given words. You can also use a single keyword without quotation (Example: title:'some title', title:Printer, title: 'some ti\*').
- Created\_at: You can either use a simple date, a date-range or >now-xh. Please note that the date format needs to be YYYY-MM-DD (Example: created\_at:2018-11-18, created\_at:\[2018-11-15 TO 2018-11-18\], created\_at:>now-1h).
- State.name: You can filter for specific ticket states (and even combine them with an OR). Please note that you need to use the english namings for states, unless you have custom ticket states defined in your instance. (Example: state.name: new, state.name:new OR open).
- Article.from: Shows all tickets that contain articles from 'xxx' (Example: article.from:'xxx').
- Article.body: Shows every ticket containing the word 'zzz' - you can also use the fuzzy operator '~' to search for similar words. The system will also allow you to use regular expressions (Example: article.body:heat, article.body:heat~).
For more details on search attributes you can into System Documentation at https://docs.zammad.org/en/latest/install/elasticsearch/indexed-attributes.html
# How to: access Knowledge Base
Customers can always navigate directly to the Knowledge Base when they have a query. Here, they can search through existing explanatory texts, guides, and checklists.
Customers can directly access the Knowledge Base by clicking on the "Knowledge Base" button on the left side of the platform's main page. [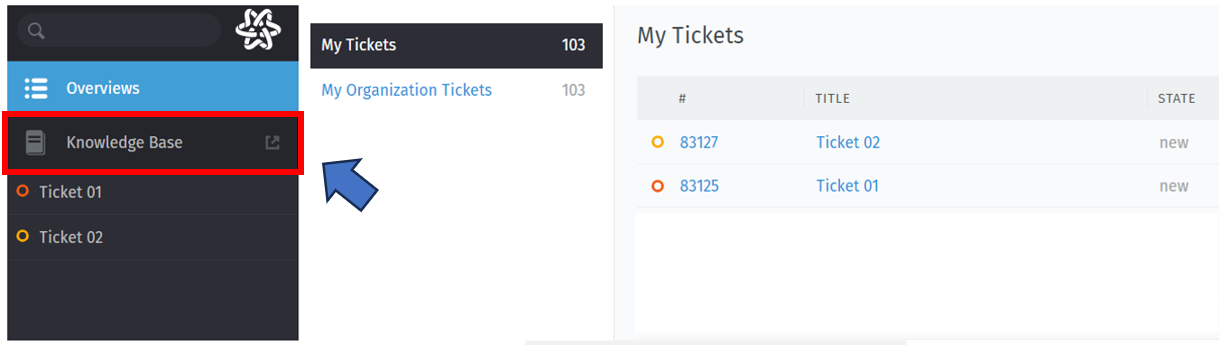](http://85.215.243.214:6875/uploads/images/gallery/2024-03/71himage.png)
For more information on navigating the Knowledge Base repository, please refer to the document ???*How to: navigate the platform knowledge base*'
# How to: manage User settings
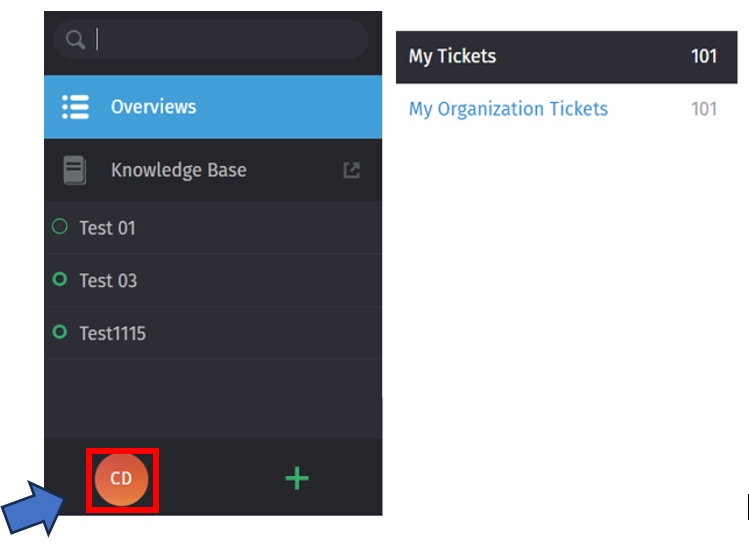
Customers may reach out the page dedicated to User Settings by clicking on the corresponding icon (see red square in the screenshot below) at the bottom left of the main navigation menu and selecting "Profile" option.
[](https://knowledgebase.dome-marketplace-dev2.org/uploads/images/gallery/2024-11/image.png)
By clicking on the corresponding option in the "Profile" section Customers can customise:
- **Appearance**: Customers can effortlessly customize the appearance settings, allowing them to choose a color scheme and layout that aligns with their preferences.
- **Language**: Customers can select their preferred language, ensuring that they can interact with the platform in a way that is most comfortable for them.
- **Avatar**: Whether it's a picture or an icon, this feature allows customers to visually represent their identity within the system.
- **Linked Accounts**: Customers can connect their accounts with other platforms, streamlining the login process and providing a cohesive experience across various systems. This feature adds convenience to user interactions and simplifies account management.