Integration Steps
Prerequisites
-
The legal entity has completed onboarding in the DOME ecosystem.
-
The LEAR has obtained a valid LEAR Credential through the Issuer service.
-
The end user (employee, contractor, etc.) has received a Verifiable Credential issued by the LEAR of their organization.
-
DID method supported:
did:key. -
Access to developer documentation and environment URLs (Verifier Authorization Server and APIs).
Step 1 – User credential issuance
The organization’s LEAR uses the Issuer service to issue a Verifiable Credential to the employee or user who will log in through the public client.
-
The credential is bound to the user’s DID.
-
It includes roles or permissions within the organization.
-
The credential is stored in the user’s Wallet application, which can later present it during authentication.
Outcome:
User holds a valid LEAR Credential stored in their wallet and ready to be presented during the login process.
Step 2 – Client configuration
Client type: Public (web or mobile app).
- Obtain and store the assigned
client_id,which can be a did:key or a unique identifier. - Register the
redirect_uri. -
Implement PKCE support (
code_challenge/code_verifier) to protect the authorization code exchange. -
Ensure secure handling of redirects and state parameters.
Outcome:
Public client is configured and ready to initiate the OAuth 2.1 Authorization Code Flow with PKCE.
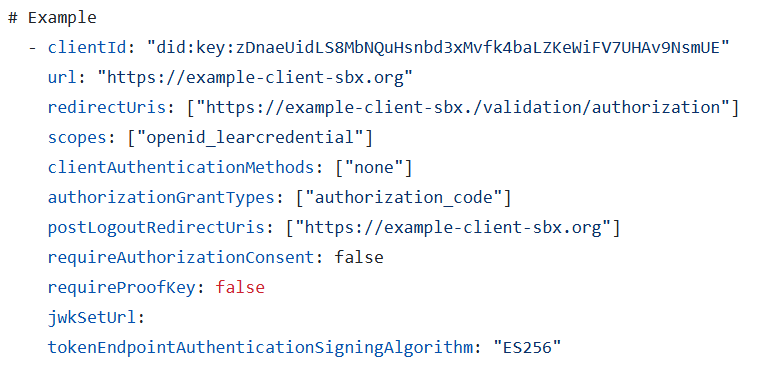
Step 3 - Registering to the Verifier (Trusted Services List)
The relying party must be registered in the Trusted Services List. The data must match with your client's configuration (see step 2).
|
Field |
Description |
|
clientId |
Should be a did:key or a unique identifier for your client. |
|
url |
The base URL of your service or application. |
|
redirectUris |
Must include all the URLs where you expect to receive authentication responses. |
|
scopes |
Currently, only openid_learcredential is accepted. This scope allows your service to request the necessary credentials. |
|
clientAuthenticationMethods |
Must be set to ["none"] |
|
authorizationGrantTypes |
Must be set to ["authorization_code"] and ["refresh_token"] if needed. |
|
postLogoutRedirectUris |
Include URLs where users should be redirected after they log out from your service. |
|
requireAuthorizationConsent |
Set to false. |
|
requireProofKey |
Set to true to force PKCE. |
|
jwkSetUrl |
Leave it blank. |
|
tokenEndpointAuthenticationSigningAlgorithm |
Must be set to ES256, as this is the only supported algorithm. |
Step 4 – Authorization request
The public client initiates the authentication process by redirecting the user to the Verifier’s Authorization Endpoint, including the required parameters:
-
client_id: has to match the one in your client's configuration -
redirect_uri: has to match the one in your client's configuration -
response_type=code -
scope =openid learcredential -
state: random string -
nonce: random string (this will be added in the ID token, so it is recommended if you rely on the ID token) -
code_challenge(derived fromcode_verifier) -
code_challenge_method=S256
Non-normative example:
| GET /oidc/auth? client_id=did:key:zDnaeUidLS8MbNQuHsnbd3xMvfk4baLZKeWiFV7UHAv9NsmUE &redirect_uri=https%3A%2F%2Fapp.client.org%2F &response_type=code &scope=openid%20eidas &nonce=1234567890abcdef1234567890abcdefXYZabc &state=1234abcd5678efgh9012ijkl3456mnop7890qrst &code_challenge=AbCdEfGhIjKlMnOpQrStUvWxYz1234567890abcdEfGhI &code_challenge_method=S256 Host: authserver.example.org |
Outcome:
User is redirected to the Verifier login screen and authenticates using their Wallet and Verifiable Credential.
Step 5 – Authorization response
After successful authentication and consent, the Authorization Server redirects the user back to the client with the authorization code and state.
Non-normative example:
| HTTP/1.1 302 Found Location: https://app.client.org/? code=A1b2C3d4E5f6G7h8I9j0K1l2M3n4O5p6Q7r8S9t0U1v2W3x4Y5z6 &state=1234abcd5678efgh9012ijkl3456mnop7890qrst |
Outcome:
The public client receives the authorization code and verifies that the returned state matches the one it initially sent.
Step 6 – Token request
The client exchanges the received authorization code for tokens by calling the Token Endpoint.
This request must include the original code_verifier used to generate the challenge.
Non-normative example:
|
POST /oauth2/token HTTP/1.1 { |
Outcome:
The Verifier validates the code and code_verifier and issues an access token and ID token.
Step 7 – Token response
Non-normative example:
|
HTTP/1.1 200 OK { |
Outcome:
-
access_tokenis used to call protected APIs on the Verifier. -
id_tokenidentifies the authenticated user. -
Tokens have a limited lifetime (typically 1 hour).
Step 7 – Use access token
The public client includes the access token in the Authorization header when calling Verifier-protected APIs:
The Verifier validates the token, checks its signature and expiration, and grants access to the requested resources.
Pitfalls to avoid
-
Mismatch between
client_idorredirect_uriin request and registration. -
Missing or incorrect
code_verifier/code_challenge. -
Using a weak or predictable
statevalue (CSRF risk). -
Reusing authorization codes.
-
Not handling token expiration and refresh flow.
-
Forgetting to set
Cache-Control: no-storein responses.
No Comments