Integration Steps
Prerequisites
-
The legal entity has completed onboarding in the DOME ecosystem.
-
The LEAR has obtained a valid LEARCredentialMachine through the Issuer service.
-
DID method supported:
did:key. -
The client’s private key is securely stored (e.g., in an HSM or vault).
-
Access to developer documentation and environment URLs.
Step 1 – Generating key pair: did:key + private key
You will need a did:key / private-key pair. It can be obtained through different methods. One option we can propose is to use our Issuer: when issuing a LEARCredentialMachine, a key pair is generated for the client. The corresponding did:key is set as the mandatee.id in the credential (which you can check in the details page after issuing it --no need to activate it). The private key must be kept securely on your side and is never shared.
Step 2 – Client configuration
Client type: Confidential.
- Obtain and store the assigned
client_id,which should be the did:key generated in the previous step. -
Ensure the
redirect_uriis pre-registered and uses HTTPS. -
Implement JWT-based client authentication (
client_secret_jwt). You client will need arequest_uriwhere a signed JWT token must be exposed (see the authorization request step).
Outcome:
The confidential client is fully configured to authenticate using signed JWTs and perform the Authorization Code Flow.
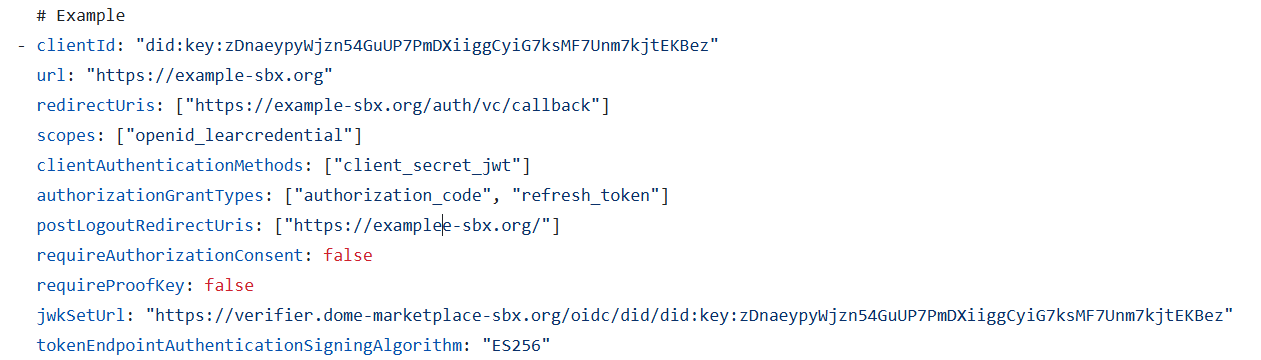
Step 3 – Registering to the Verifier (Trusted Services List)
The relying party must be registered in the Trusted Services List. The data must match with your client's configuration (see step 2).
|
Field |
Description |
|
clientId |
Should be a did:key that identifies your client. |
|
url |
The base URL of your service or application. |
|
redirectUris |
Must include all the URLs where you expect to receive authentication responses. |
|
scopes |
Currently, only openid_learcredential is accepted. This scope allows your service to request the necessary credentials. |
|
clientAuthenticationMethods |
Must be set to ["client_secret_jwt"] |
|
authorizationGrantTypes |
Must be set to ["authorization_code"] and ["refresh_token"] if needed. |
|
postLogoutRedirectUris |
Include URLs where users should be redirected after they log out from your service. |
|
requireAuthorizationConsent |
Set to false. |
|
requireProofKey |
Set to false. |
|
jwkSetUrl |
Since you're using a did:key for your clientId, you do not need to provide your own jwkSetUrl: the verifier can derive your JWKS directly from the did:key. Just add this string: “<verifier-url>/oidc/did/<your-did-key>”. |
|
tokenEndpointAuthenticationSigningAlgorithm |
Must be set to ES256, as this is the only supported algorithm. |
Step 4 – Authorization request
The confidential client starts the authorization process by redirecting the user to the Authorization Endpoint with these parameters :
-
client_id: has to match the one in your client's configuration -
redirect_uri: has to match the one in your client's configuration -
response_type=code -
scope =openid learcredential -
state: random string -
nonce: random string (this will be added in the ID token, so it is recommended if you rely on the ID token) request_uri: see the explanation below*
Non-normative example:
*The request_uri. must expose an Authorization Request Object., which is an JWT and must include these parameters. These parameters must match the ones of your client's configuration (and the ones included in the request as well):
client_idscope-
redirect_uri
Step 5 – Authorization response
After the user successfully authenticates and authorizes access, the Authorization Server redirects back to the client’s redirect_uri with an authorization code.
Non-normative example:
Step 6 – Token request
The client exchanges the authorization code for tokens by calling the Token Endpoint.
In this step, the client authenticates using client_secret_jwt, sending a signed JWT in the client_assertion parameter.
Non-normative example:
Non-normative example of a Token Request:
Step 7 – Token response
Non-normative example:
Outcome:
Step 8 – Use access token
The confidential client uses the access_token to call Verifier-protected APIs:
No Comments